Training Tips & How to's
 This
section is aimed at people looking to take either CBT
or their full motorcycle licence. If you're having trouble
getting
the hang of something, we hope these tips will help.
Alternatively
if you want more information about Motorcycle Safety, try our safety
and protection guide This
section is aimed at people looking to take either CBT
or their full motorcycle licence. If you're having trouble
getting
the hang of something, we hope these tips will help.
Alternatively
if you want more information about Motorcycle Safety, try our safety
and protection guide
Performing a 'U' turn
Slow speed control is key to a good 'U'
turn. You will need to keep the engine pulling throughout the
turn
and control the speed using the back brake. It's amazing how slow
you can go and keep you're balance. Here are the basic steps.
|
-
Positioning - You need to
make as much
use of the road as possible, so try to get as close to the curb as you
can, but leave enough space for your foot (12" seems about right).
-
Observation - It has to
be clear and
safe, before you begin. Have a good look in front and a good look
behind to check there are no oncoming vehicles. Also keep an eye
on any pedestrians in case they cross.
-
Moving off - Give the
bike a bit more
revs than normal, to ensure it gives you constant power, and bring to
the
biting point. Move off slowly riding/slipping the clutch and
dragging
the back brake (Do Not touch the front brake). Make sure you have
got your balance before beginning the turn. Perform a lifesaver
to
check the road as you begin the turn. Ease the handle bars round
slowly and evenly (not straight to full lock), while controlling the
speed
with your back brake. Lean slightly away from the turn to
compensate
for the bike wanting to fall in. As you go round you should keep
your head in the direction you want to go (don't look at the ground or
kerb) as it helps your balance.
-
Finish - Stop when you
reach the other
side in the same position as you started. Don't forget to check
in
front and behind, before you pull away again.
|
 If
you start to fall let the clutch/rear brake out a bit to increase
your
speed. If you can't turn tight enough, use your back brake to
slow
the bike down. Remember if you're going up or down hill, you will
need to compensate (more power up, more brake down). This is also
the case If the road has a camber. If
you start to fall let the clutch/rear brake out a bit to increase
your
speed. If you can't turn tight enough, use your back brake to
slow
the bike down. Remember if you're going up or down hill, you will
need to compensate (more power up, more brake down). This is also
the case If the road has a camber.
Performing an emergency stop
The Emergency stop tests your
reactions
and ability to stop the bike at speed as quickly and safely as
possible.
It is generally taught as a 5 point system.
-
Shut off the accelerator.
-
Apply the front brake.
-
Apply the rear brake.
-
Increase the pressure on the
front brake.
-
Apply the clutch to avoid
stalling (on a manual).
|
|
It sounds like a lot to remember, but
is
actually easy once you've done it a few times. There are also a couple
of things that you should not do during the emergency stop. It's
a braking exercise, try to keep the bike in straight line, no mirrors,
no gear changes, don't skid. Aim to stop with you left foot
coming
down and covering the rear brake still.
|
If it's dry, you should apply
most of
the braking pressure to the front brake (approx. 80%) and aim to stop
as
quickly as possible. However, if it's wet you must apply the
brake
pressure more evenly (50% front, 50% rear) and be prepared to take at
least
twice as long to stop. It's very easy to lose the front wheel in
wet conditions. |
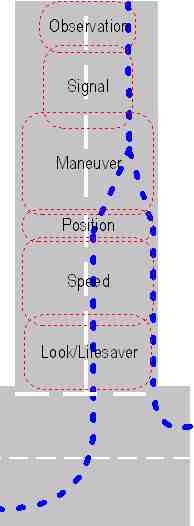
Left and right turns
You may have come across the acronym
OSMPSL
or Observation, Signal, Manoeuvre, Position, Speed and Look,
which
describes the approach to turning left or right. It's explained
in
a bit more detail below:
-
Observation - Check your
mirrors before
you do anything. Making a turn will change your road position,
speed
and ultimately your direction, so it must be safe to perform the
exercise.
-
Signal - Indicate to
other road users
that you intend to turn.
-
Manoeuvre & Position -
Move and
position your bike towards the turn, if turning left move to the left
quarter
of the lane, if turning right, the right.
-
Speed - Start
slowing down (Remember
user your front brake followed by back) and changing down ready to take
the corner. It is important to get the approach right, so you
have
plenty of time to look around and react to any oncoming danger.
-
Look - Before it's too
late to abort
the turn perform a lifesaver to make sure nobody is squeezing up your
outside
(right turn) inside (left turn). Just before you get to the end
of
curb (approx. 10') is about the right time to check.
|
|
You should also perform rear
observations
once completing the turn and don't forget to cancel your signal!
 |
Turnings can often have less
space than
you first anticipated, which may mean you have to go round slower than
expected. Make sure you get into the right gear early, so that
the
bike will still pull you round if you need to slow down. This is
particularly important on a heavy bike or when carrying a passenger. |
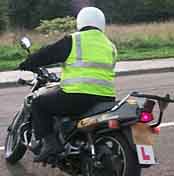
When you are not riding your bike
Walking with your bike
Most people don't have too much trouble
pushing a light-weight motorcycle, moped or scooter, as the bike is
relatively
light. However, as you move up to a larger, heavier bike you may
find it difficult to keep control when walking. You will be asked
to walk your bike (normally across the road) on your test. So
here
are a few tips that may help:
-
It's easier to pull the bike than to
push
it, so if you position your body close to the handle bars and next to
the
tank, you'll find that you have greater manoeuvrability as the bulk of
the bike will be slightly behind you.
-
Hold the bars with both hands (as if
in a
riding position) if you're gentle you will be able to use the front
brake
to slow or stop the bike (be careful not to snatch the front wheel).
-
Lean the bike towards you, don't try
to hold
it upright. If it's upright it can fall either way (and you'll
never
stop it, if it falls away from you).
-
Keep your head up and look where you
are going
and don't forget to keep a good look out for other road users.
General Tips: With a heavier bike,
get into the habit of putting the side stand down before you get off
the
bike. It's very easy to drop it if you don't. When you've
completed
the manoeuvre put the side stand down before you climb on.
Putting your bike on its centre stand
The bigger the bike, the more you'll
need
to rely on technique rather than force. Centre stands are
designed
to act like a lever. You push down with you foot and up comes
your
bike. Here are the basic steps:
-
Stand on the left of your bike with
your left
hand on your handle bars and your right on the lifting point (sometimes
a grab rail or bar under the pillion seat).
-
Lower the stand with your right foot
and press
down a little so that the bike begins to stand upright. In this
position
as long as you keep your weight on the stand the bike can't fall over.
-
Now put most of you weight on the
stand and
lift the bike backwards with your right hand. If you're doing it
right,
your foot will do all the work.
|
When taking your bike off the
stand, remember
to keep your foot on the stand until your ready to balance the
bike. |
|